
GET IT
OBS Studio Guide: Learn how to stream like a Pro
⚡ New from StreamSpell: Deck Smith — AI-powered Stream Deck Profile Builder. Type one prompt, get a download-ready profile for any device. Try it free →
OBS, also known as Open Broadcaster Software, is a free, open-source streaming and recording software maintained by OBS Project. By using it, you can capture image/audio and stream it live on various streaming platforms.
The software captures the image, usually from a webcam or even your computer screen, so you can make lives and much more! It encodes these images and streams them to platforms like Youtube, Twitch or even Facebook.
Let's learn a little more about OBS Studio and what it offers!
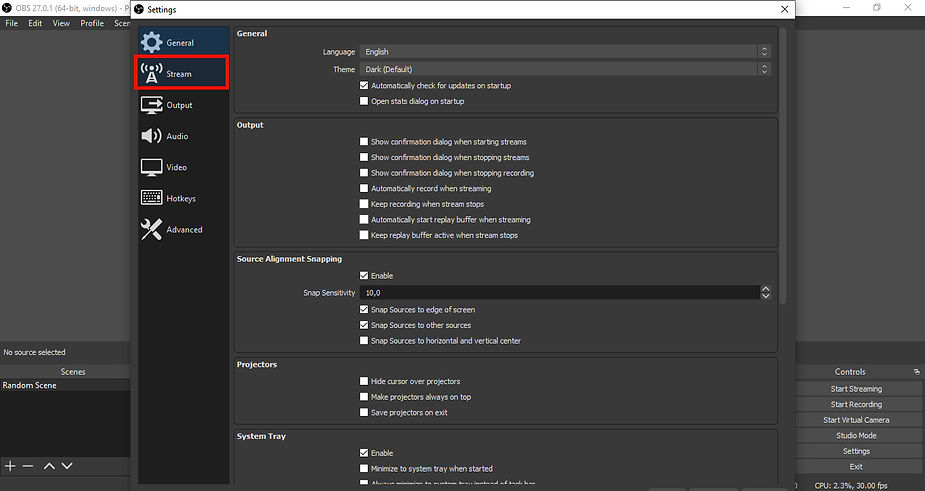
THE INTERFACE
The OBS Studio interface is very simple and intuitive, generally being very easy to learn and understand!
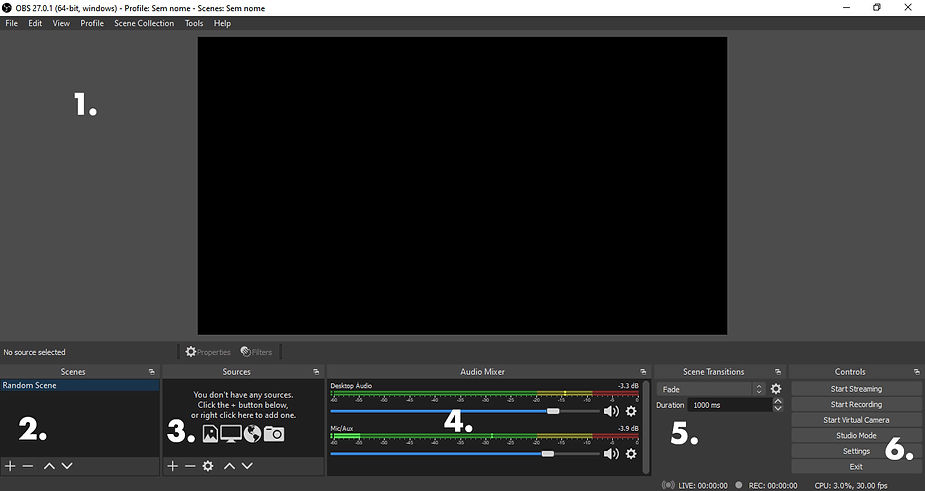
1. Preview Screen
This is the preview screen! This is where you can preview your scenes and also keep an eye on what's being broadcasted! Here you can also organize all the items inserted, checking where they will be located on the screen!
2. Scenes
This part is where you can create your "scenes". It's where you can share the "scenarios" that you will create to record your video!
3. Sources
This is where the capture sources are organized! This is the part/panel you will probably use the most, as this is where you can select the capture source that will be used, such as cameras, your computer screen, and so on.
4. Audio Mixer
On this panel, you'll see the audio mixer. Here you can raise or lower the broadcast audio volume. It is also possible to mute the sounds and then you can have a completely audio-free transmission!
P.S.: Just keep in ming that the more audio items you add in the "Sources" panel, more and more volume icons will appear in the mixer!
5. Scene Transitions
This panel offers options that are considered a little more technical. In it you can choose and even configure a scene transition to be used during your video or broadcast.
6. Controls
Right next to the "Scene Transitions" field, you will find the "Controls". There, you have access to settings buttons, studio mode and it is also where you will find the buttons to start transmitting and recording the video.
HOW TO CONFIGURE OBS TO STREAM
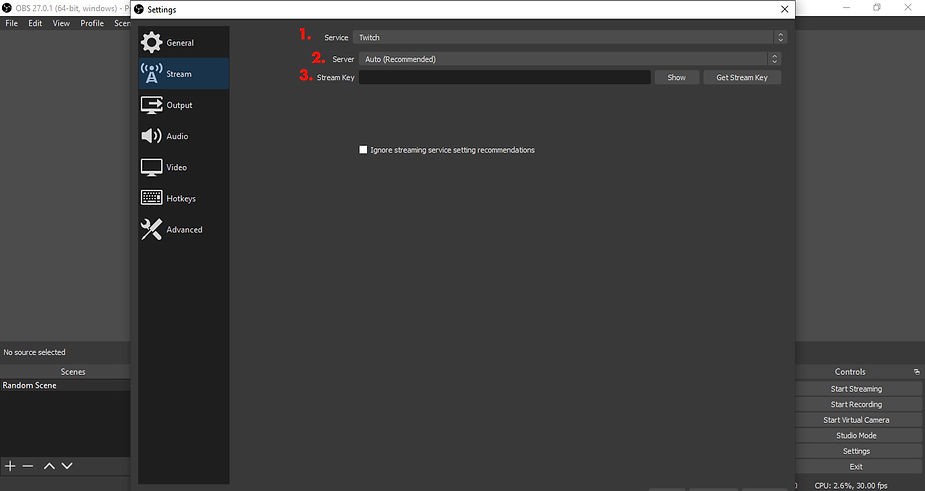
On the main screen, you can click on the "Settings" button.
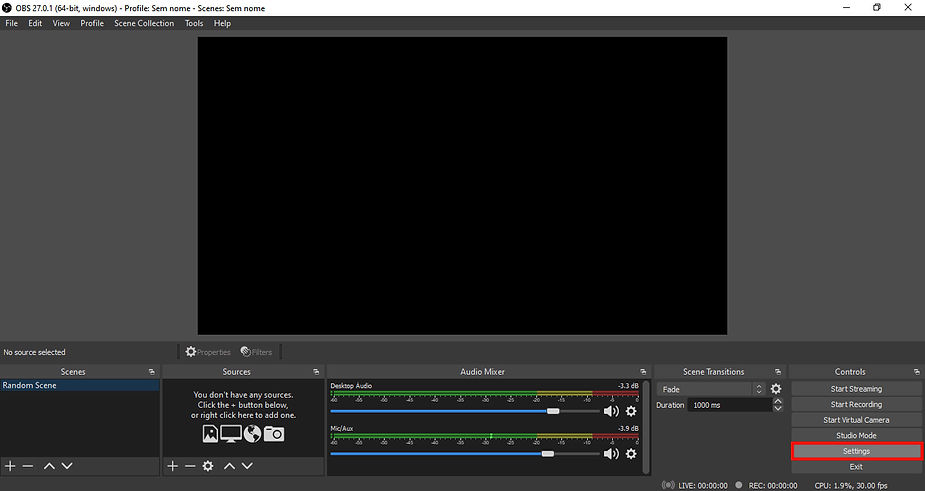
A new window will show up, and in it you can click on the "Stream" option, on the left side of the screen!
When you click on "Stream", you will be able to choose the "Service", which is the platform where you intend to stream. If your live stream uses a streaming platform, you can choose from the available options, such as Twitch, YouTube, Facebook, among others.
Right below, you will find the option to configure the "Server". You can select the "Automatic (recommended)" option or select a specific server. Remember to actually choose the server closest to your broadcast location!
The next thing will be the "Stream Key". Right there you must paste the "key" (a code) provided by the server where you are streaming. I'll explain better about it below!
Once you've set everything up as you need, you can click on "Apply" and then on "Ok".
STREAM KEY
The "Stream Key" is a kind of "code" that you will need to inform OBS Studio (in that little field we just discussed). Each streaming platform will offer a key and it must be copied from the respective service you have chosen to use.
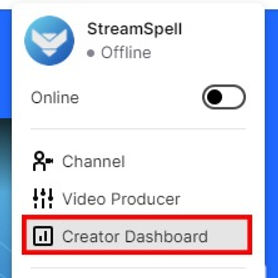
On Twitch: To get your stream key on Twitch, you must first login to your account! Once you've done that, just click on your profile picture, in the upper right corner, and then click on "Creator Dashboard".
On the page that will open, you can look for the "Settings" option on the left side of your screen! When clicking there, a menu will appear right below, and then just click on "Stream".
A new page will open, and right there, in the first option, you will find a big code called "Primary Stream Key". You can click on "Copy" and you're done! There's your key, the one you should be pasting on the OBS Studio field we discussed before.

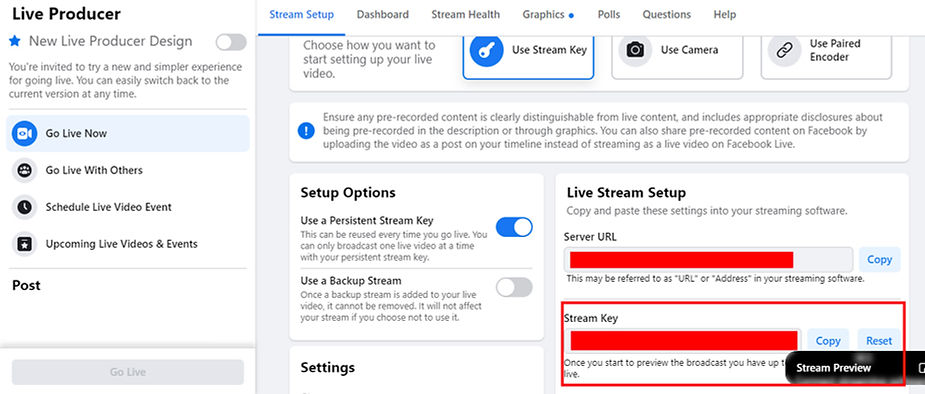
On Facebook: To get your stream key on Facebook, you must access the social network's online streaming center and click on "Create live stream"!
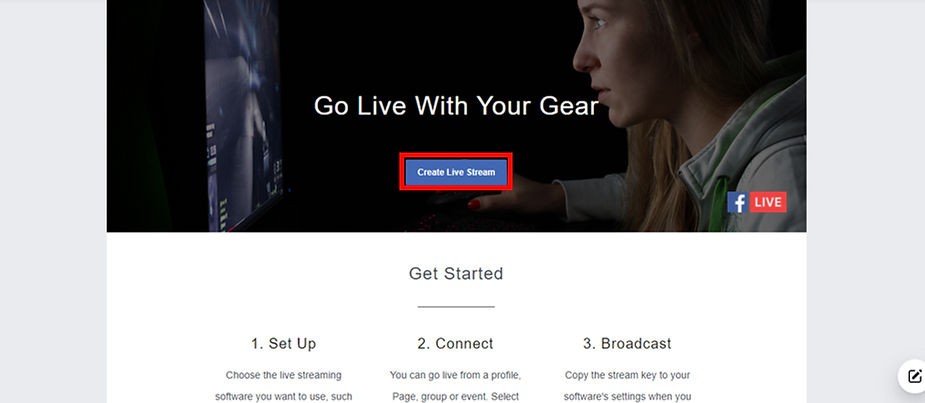
Once you click on this option, a new page will open and when you scroll it down, you can find your "stream key". And if you can't find it on this screen, don't worry! As soon as you start your stream, a window will appear, offering you the possibility to copy your key!
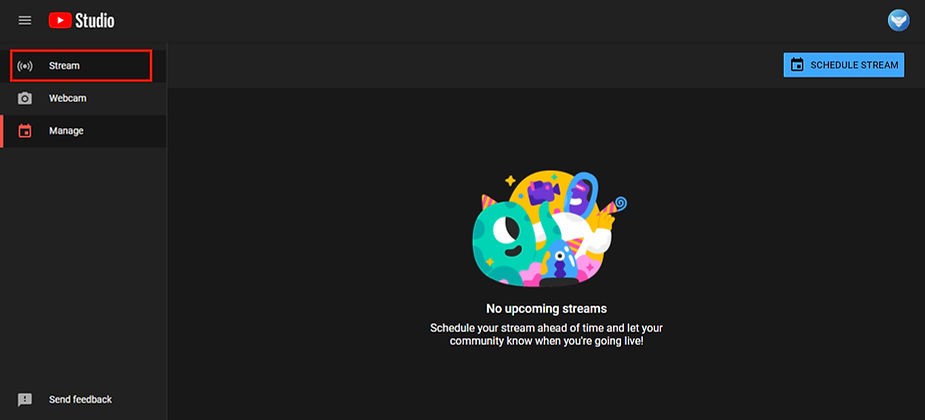
On YouTube: Once on the platform, click on the camera icon on the top right corner of YouTube and choose the "Go Live" option.
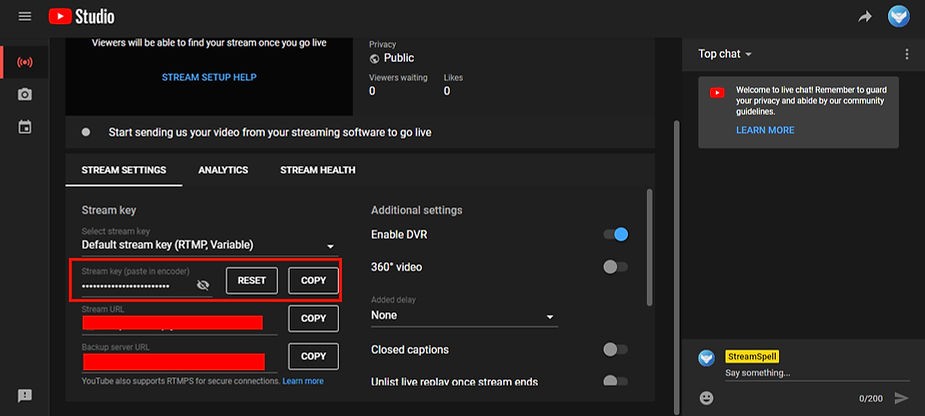
A new screen will show up and you will be able to see a field called "Stream". Click there and then select and copy the stream key. Now you can paste it on the correct field (inside OBS).
CREATING SCENES ON OBS STUDIO
Scene structure is something very important when it comes to OBS Studio. With them, you can customize the environment of your stream or broadcast!
To create a scene, click on the "+" symbol at the bottom of the screen.
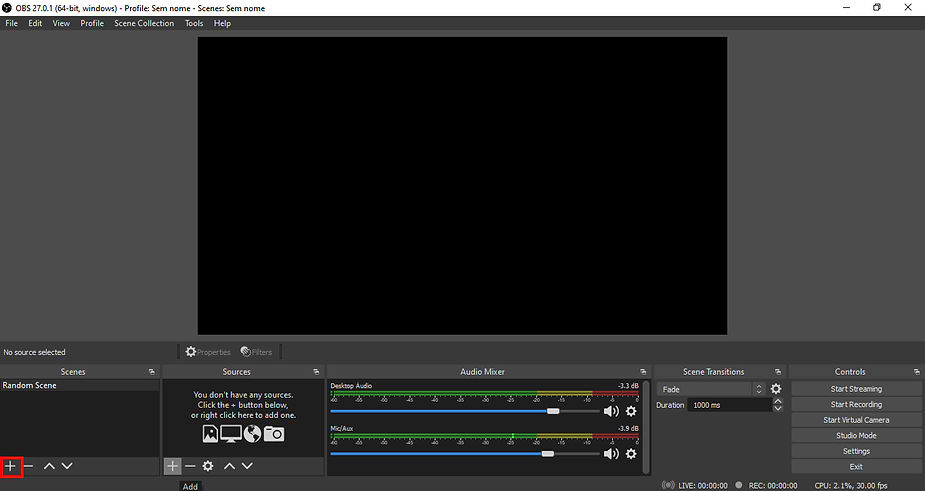
Then choose and write a name for your scene and click "Ok". And that's it! Your new scene is created!
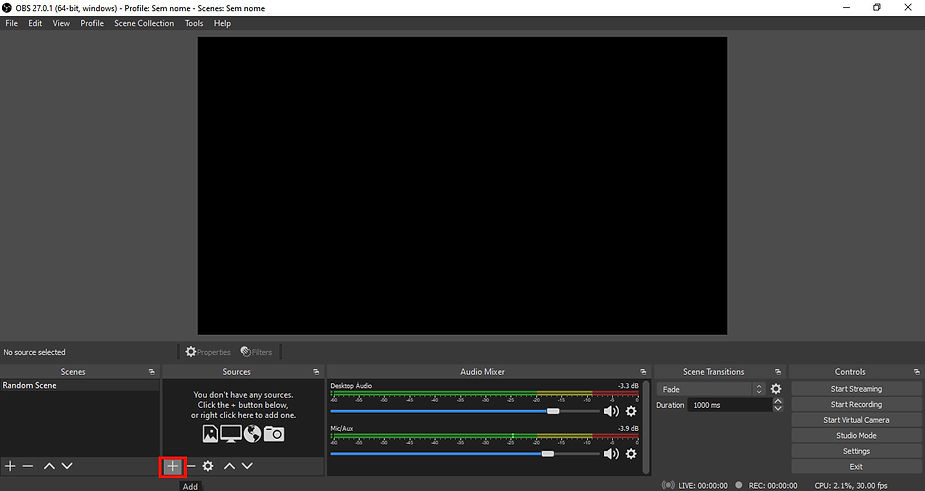
CAPTURE SOURCES
Capture sources end up being one of the most important parts of your stream, as they will indicate which image sources will be transmitted, such as the camera, webcam or even your own computer screen.
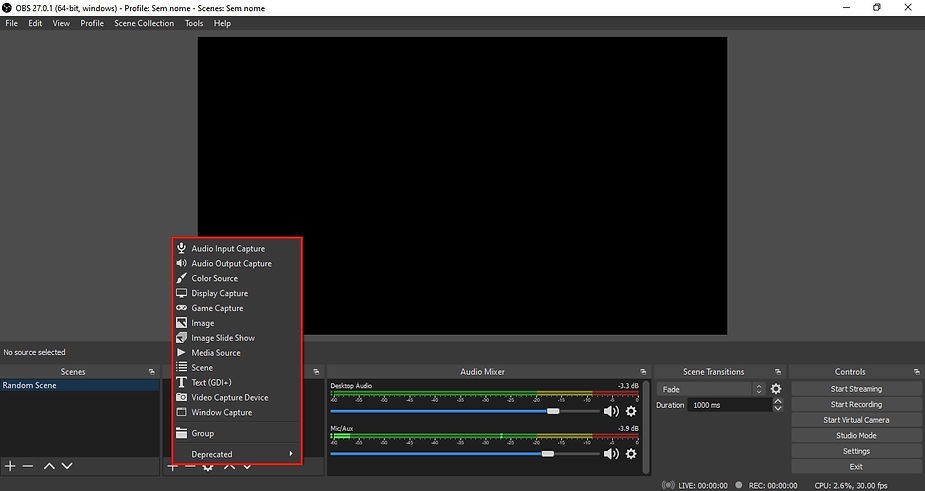
Adding a capture source is very simple! All you need to do is click on the "+" icon located below.
After doing this, you will see a list with different capture sources. Each of them serves to add a new feature to its respective scene.
You can choose the source that fits exactly what you need! For example, you might be using images from a webcam, or some external camera, the entire computer screen, or even just a specific window.
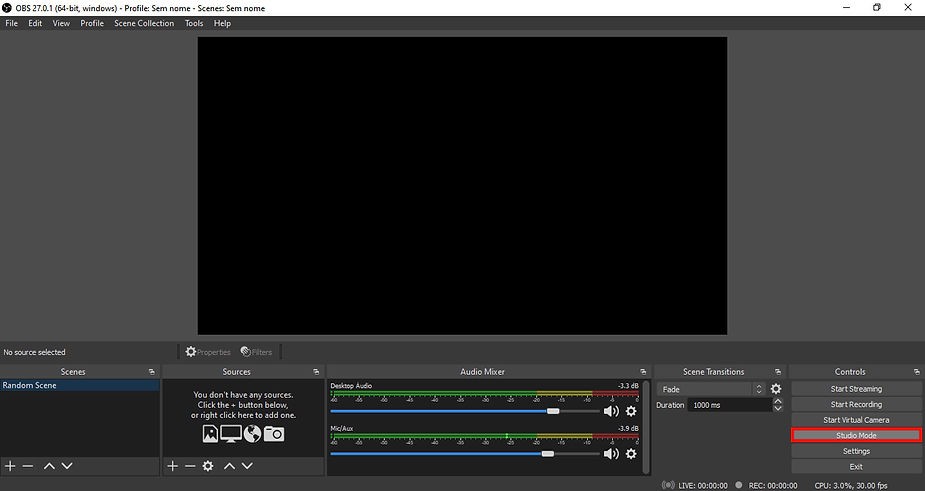
STUDIO MODE
OBS Studio also offers a very useful and cool option for anyone who is going to broadcast something through it. That tool is the "Studio Mode".
With this option, you can make changes to your scenes and more, without your viewers seeing what you're doing!
If you want to check it, don't worry! It's very simple! You just need to click on the button that says "Studio Mode" in the right corner of the software.
Your screen will look exactly like this after clicking on "Studio Mode":
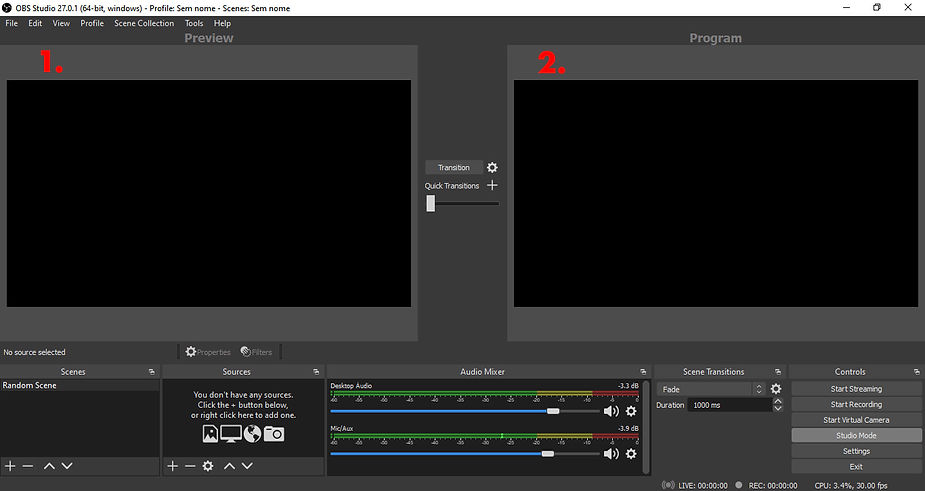
This is the screen where you can change everything in your stream, scenes, sources and more! None of your viewers have access to this screen, so they cannot watch or see what you will be doing on this panel. So any changes you want to make, you can make on this screen!
Now this one is the screen that shows you exactly what your viewers are seeing and what's showing up to them!
CONCLUSION
This is the end of our post! We just wanted to bring a little more of this software so used and loved by many streamers! Don't forget that "messing around with it" and learning more about any software is always a good thing and you should be constantly doing it!
So now you know a little more about OBS Studio and your streams will never be the same again!
We hope you master this software and have great live streams!
✨How to Install Stream Overlays in OBS Studio 2025
Check out our blog post: OBS Studio Stream Overlay Setup Guide for Twitch | 2025
💡 Want to level up your stream setup even more?
Here are a few helpful guides and free resources:
- Designing your Twitch layout too?
Check out our Twitch Panel and Graphics Definitive Guide (2025) for updated dimensions and best practices.
- Still deciding between OBS Studio and Streamlabs?
We've got you covered with a full breakdown: Streamlabs or OBS Studio?
- 🎁 Looking for free overlays, alerts, or transitions?
Don't miss our list of awesome freebies for your stream: Free Assets for Streamers: Overlays, Alerts, Transitions, and More!
💙 Explore more from StreamSpell
Find more animated stream overlays, animated stream alerts, animated transitions, Stream Deck Icons, emotes and badges, stream widgets (Chat Box, Event List, Goal Bar), and custom stream designs:
With lots of love and wishing you all the luck,
StreamSpell Team 💙
🎮 Build Your Stream Deck Profile with AI
StreamSpell also just launched Deck Smith — an AI-powered Stream Deck Profile Builder. Just type a prompt and get a complete, download-ready Stream Deck profile adapted for any device.
Level up your stream with practical guides for OBS, Twitch, YouTube and Stream Deck.

AI Stream Deck Profile Generator: Build Profiles Faster
Build Stream Deck profiles faster with Deck Smith, a free AI Stream Deck profile generator by StreamSpell.

40 Webcam Overlay Bundle by StreamSpell
Get 40 stream-ready webcam overlays with animated styles, color customization, and themes like anime, neon, RPG, cute, and more.

5 Strategies for Staying Motivated as a Content Creator
Take care of yourself with these quick tips for staying motivated throughout your content creation journey.
Browse All Articles
Browse Stream Overlays